

Overview:
This tutorial provides a method to connect an Ag Leader ParaDyme to the Lefebure NTRIP Client for Android.
Hardware Requirements:
- Ag Leader ParaDyme unlocked to RTK
- Ag Leader ParaDyme Auxiliary Cable PN: 4002226-15. This cable may require modification in order to power up the Bluetooth serial adapter. Alternatly, a custom made cable can be made.
- Bluetooth Serial Adapter. In this example a Sena Parani SD1000 is used, although other brands and models could also work.
- Null modem M/M adapter. Note: some null modem adapters do not connect pin 9. Power is required on pin 9 for the Parani Bluetooth serial adapter.
- Android device with internet connection that supports SPP (serial port protocol).
Hardware Layout:
The general hardware configuration should look similar to the following:
Auxiliary Cable Modification:
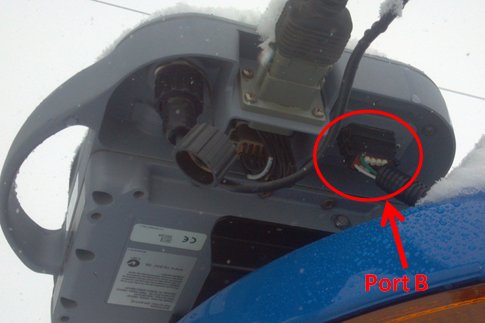
The ParaDyme auxiliary cable (PN 4002226-15) plugs into port B of the ParaDyme and is used to feed in RTK corrections from an external source. Port B is located on the underside of the ParaDyme, next to port A.
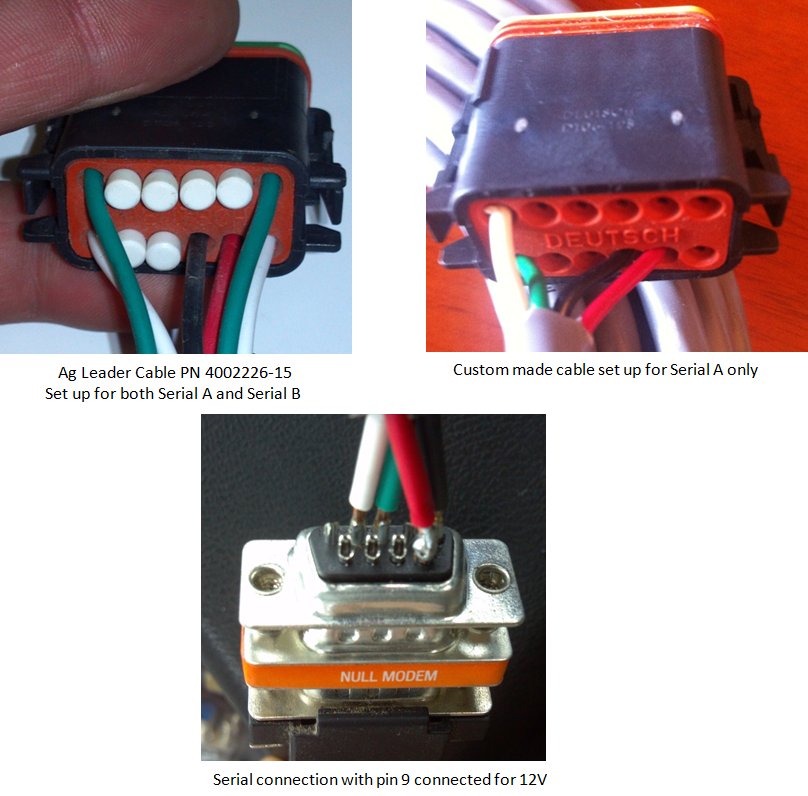
There are three ends on the cable: Serial A, Serial B, and 12V/Ground. In the case of both Serial A and Serial B, by default the cable provides wires for Rx (pin 2), Tx (pin 3), and Ground (pin 5). In order to power up the Bluetooth serial adapter via the 9-pin serial connection on Serial A or Serial B, an additional wire must be added to the cable to provide 12 volts on pin 9. If the Bluetooth serial adapter being used is to receive power from a source other than the 9-pin serial connection, this step can be skipped. The pin outs of PN: 4002226-15 (including pin 9 modification) on can be summarized as follows:
From the factory both Serial A and Serial B are NOT connected with Pin 9 (12 Volt). If the serial Bluetooth adapter you are using allows for 12 volt power up via pin 9, you will need to splice into Pin 8 on the Deutsch connector for power. Also, make sure your serial Bluetooth adapter allows for 12 volts to power it up. Some companies/models will only support smaller voltage levels such as 5V, in which case you will need to determine a different method to power the adapter.
In this setup Serial B will not be used and can be ignored. The power connector itself will not be used either, however the 12 volt wire can be spliced and tapped into to provide power to Serial A (pin 9).
Hardware Installation:
1. Connect the modified ParaDyme Auxiliary cable into port B of the ParaDyme. Route the cable into the cab of the tractor. Install cable clamps or zip ties to secure the cable once installed.
2. Connect the null modem M/M adapter to the Serial A connection.
3. Connect the serial Bluetooth adapter to the null modem adapter.
4. Set the Baud rate on the Parani SD 1000 to 38400. There are three small switches on the SD1000 that allow the user to set the baud rate. Refer to the diagram on the SD1000 for proper setting of the switches.
5. If the ParaDyme is powered up, and if pin 9 was connected to 12V power small green indicator lights should turn on to indicate that the Bluetooth serial adapter is powered on.

Bluetooth Pairing:
Once the Bluetooth serial device is connected to the auxiliary cable and is receiving power, the device must first be manually paired with the Android device. On the Parani SD 1000 there is a small button labeled “paring” that can be pressed with a small pointed object (small pick, pin, or nail can access it). Depress the manual pairing button and hold until the lights start to blink. Next in your Android device go to Bluetooth device setting and select an option that reads similar to “scan for devices”. If the pairing is successful, your Bluetooth serial adapter device name should appear under the list of available devices. Also if the pairing is done properly, this step should only be required once.
Software Installation:
1. Install Lefebure NTRIP Client from the Android market on your Android device
2. Once installed, open the application and enter setting for Receiver and NTRIP. In this example we are connecting to MyWayRTK using a GLONOSS enabled ParaDyme. The settings will appear similar to the following:
3. Under NTRIP Settings > Data Stream, the available streams will not be made available until you first attempt to connect to your data correction source. After your first attempt at connecting the list should be made available and you will be able to select the data stream appropriate for your application.
Set up of Integra/ParaDyme:
The two main settings that need to be changed in the Integra/ParaDyme to access data corrections from the Lefebure Android NTRIP are:
- RTK Correction Type = External Radio
- NMEA Out: Port A Messages and Configuration
The following steps will attempt to summarize how to make the above to main changes.
1. AutoSteer Setup Screens: On the Integra Home screen select “wrench” (top right corner), then “GPS Guidance Setup” (bottom of screen GPS icon), then under “Guidance/Steering” select the “wrench” to the right of “ParaDyme Steering”. This should take you to the “AutoSteer Setup” screen.
2. RTK Correction Type: Under “GPS” select “RTK”. Select “RTK Connection Type”, select “External Radio”, and then finally select “Apply”.
3. NMEA Out: Go back to the “AutoSteer Setup Screens”, and select “NMEA Out”. Then under Port A Messages Set GGA (Current) = 10 Hz. All other NMEA messages should be set to off. Under Port A Configuration set Baud Rate = 38400 and Format = 8N1.
Document created by Seth Wenzel
Last updated: March 15, 2013